
Samples Guide
Version 1.0.2 | Device: Youbiquo Leonardo XR | Base SDK: Snapdragon Spaces 1.0.4
Samples are organised in two sections:
- LeonardoXR Samples — samples specific to Leonardo XR proprietary and interaction features.
- Snapdragon Spaces Core Samples — samples provided by Qualcomm for base AR/XR features.
Importing Samples
Snapdragon Spaces Core Samples
The Core Samples package is importable from Window > Package Manager > Snapdragon Spaces > Core Samples. After import, add all scenes to the build via Window > XR > Snapdragon Spaces > Add Scenes to Build Settings.
LeonardoXR Core Samples
The LeonardoXR Core Samples package is importable from Window > Package Manager > LeonardoXR > Core Samples. After import, scenes are available in Samples/LeonardoXR/[version]/Core Samples/Scenes/.
LeonardoXR Samples
Interaction Scene
- Scene:
Samples/LeonardoXR/.../Core Samples/Scenes/Interaction
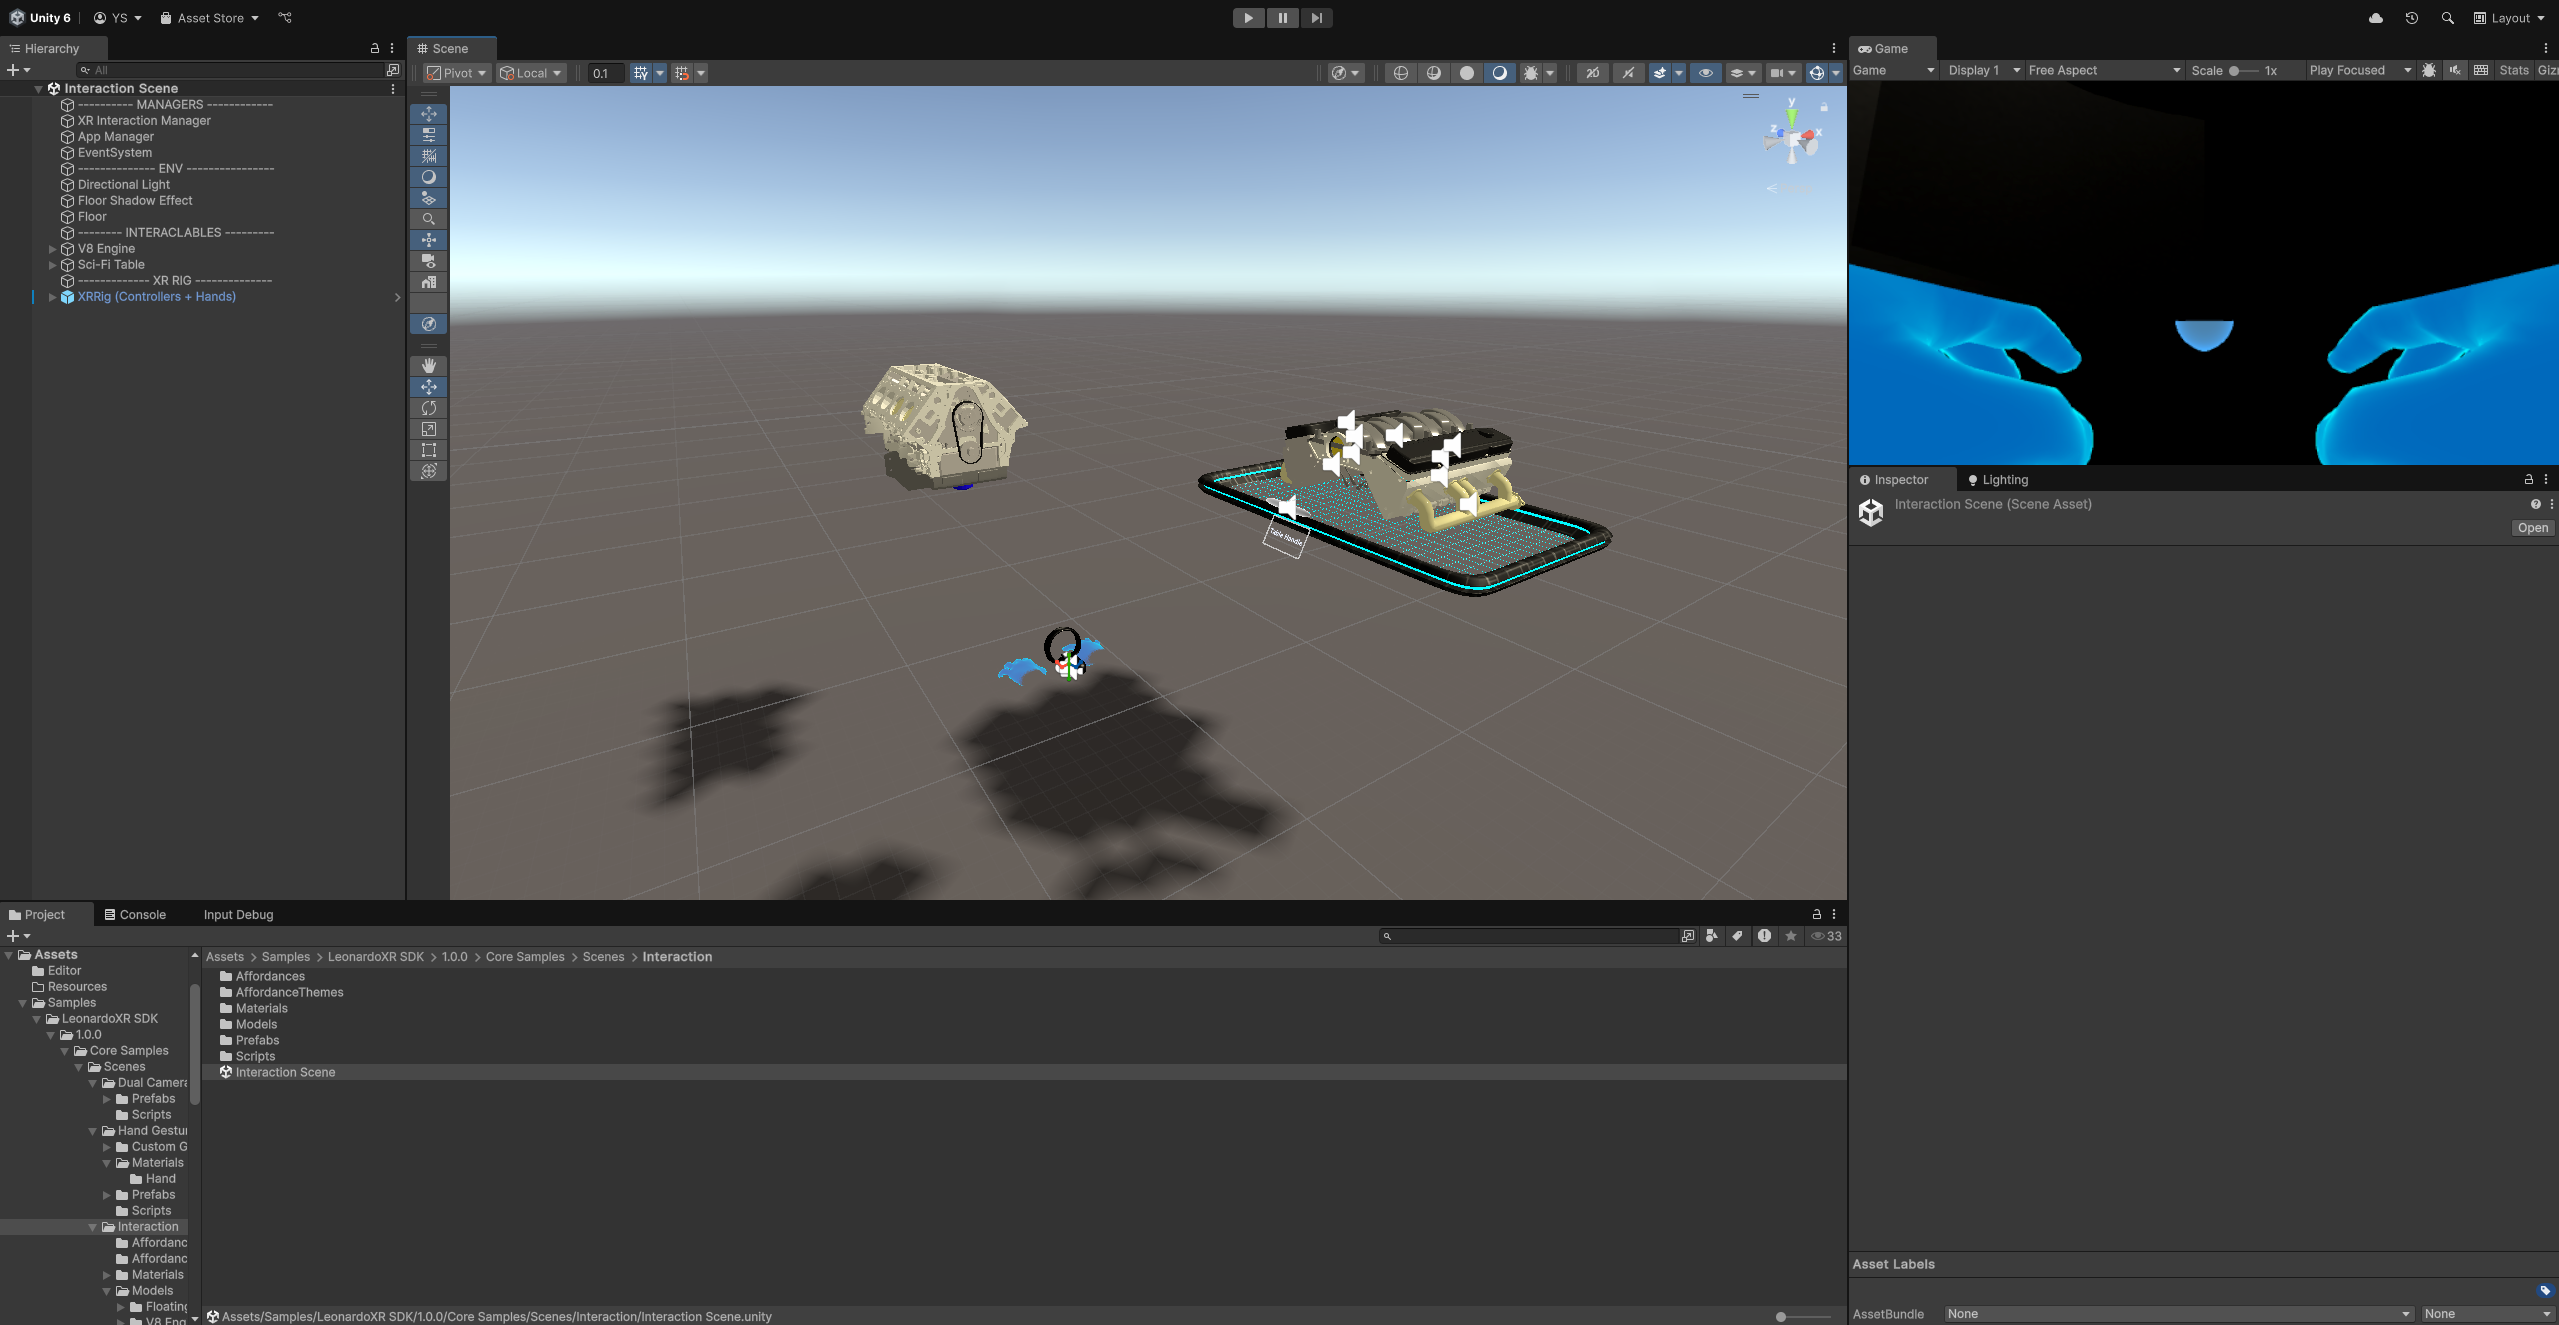
A fully pre-configured interaction scene for controller and hand usage. The player assembles a V8 engine on a sci-fi floating table, demonstrating the core interaction capabilities of the SDK.
What it demonstrates
- XR Grab Interactable with socket snapping
- Affordance system (visual and audio feedback on selection and hover)
- Hand Menu for in-scene navigation
- Compatible with both controller (Companion Controller) and hand tracking (Dual Hand Mode)
How to run it
Open the Interaction Scene from the Package Manager samples, add it to the Build Settings, and deploy to the LeonardoXR. See the Build and Run section below.

Hand Gestures Scene
- Scene:
Samples/LeonardoXR/.../Core Samples/Scenes/Hand Gestures
Demonstrates hand tracking, custom gesture recognition, and real-time hand shape inspection on LeonardoXR.
What it demonstrates
- Custom gesture definition using
XRHandShapepose assets - Gesture icons and visual feedback for recognised gestures
XRHandGestureDebugUIfor real-time joint and gesture state inspection- Integration with the XR Hands gesture system
Prerequisites: XR Hands package installed with the Gestures and Hand Visualizer samples imported.
Dual Camera Access Scene
- Scene:
Samples/LeonardoXR/.../Core Samples/Scenes/Dual Camera Access
Demonstrates synchronised access to both Leonardo XR cameras using the Android Camera2 API via a native Java plugin.
What it demonstrates
- Direct camera frame retrieval using the
Camera2Android API - Native plugin integration (
CameraAccessUtility.csbridging toCamera2StateCallback.java) - Camera info display and frame rendering in-headset
Prerequisites: Dual Camera Access enabled in the LeonardoXR feature group.
DOCUMENTATION IN PROGRESS Detailed API documentation and configuration guide will be available in a future release.
AI Image Analyzer Scene
- Scene:
Samples/LeonardoXR/.../Core Samples/Scenes/GPT Image Analyzer
Demonstrates AI-powered image analysis on LeonardoXR using GPT vision APIs, with audio output via Google Text-to-Speech.
What it demonstrates
- Capturing frames from the device camera
- Sending frames to a GPT image analysis API (
GPTImageAnalyzer.cs) - Converting the text response to speech and playing it back (
GoogleTextToSpeechConverter.cs)
Prerequisites: Valid GPT and Google TTS API keys configured in the scene.
WebXR Scene
- Scene:
Samples/LeonardoXR/.../Core Samples/Scenes/WebXR
A scene pre-configured for WebXR export, targeting the Wolvic browser pre-installed on LeonardoXR.
What it demonstrates
- WebXR-compatible XR Rig setup using the
XRRig WebXR (Controllers)prefab - How to build a Unity project for WebXR using the De-Panther WebXR Export Utility
Prerequisites: Download and install the De-Panther WebXR Export Utility before building.
Snapdragon Spaces Core Samples
Local Anchors Sample
- Scene:
Samples/Snapdragon Spaces/.../Core Samples/Scenes/Anchor
Demonstrates creating and destroying local anchors to precisely track a point in the real world. Requires the Spatial Anchors feature enabled in OpenXR.
How it Works
A transparent positioning gizmo floats 1 metre in front of the camera. When Place anchor on surfaces is enabled, a ray is projected forward each frame. When a surface is hit, the gizmo turns yellow. Touching the touchpad or using the gaze interactor creates an ARAnchor with a tracking gizmo.
private void OnAnchorsChanged(ARAnchorsChangedEventArgs args)
{
    foreach (var anchor in args.updated)
    {
        Destroy(anchor.transform.GetChild(0).gameObject);
        var newGizmo = Instantiate(
            anchor.trackingState == TrackingState.None
                ? GizmoUntrackedAnchor
                : GizmoTrackedAnchor);
        newGizmo.transform.SetParent(anchor.transform, false);
    }
}
Saving, Deleting and Loading Anchors
- Enable Save new anchors to local store to persist each new anchor.
- White cube on gizmo = anchor saved and tracked; red cube = not tracked.
- Load All Saved Anchors — loads and attempts to localise all stored anchors.
- Clear Store — deletes all stored anchors (does not destroy already-loaded anchors).
- Destroy All Anchors — destroys all active anchor GameObjects (with a short delay).
Hand Tracking Sample
- Scene:
Samples/.../Core Samples/Scenes/HandTracking
Demonstrates hand joint visualisation and gesture recognition via the QCHT interaction package. Requires Hand Tracking and QCHT / XR Hands packages.
Hit Testing Sample
- Scene:
Samples/.../Core Samples/Scenes/HitTesting
Demonstrates continuous hit testing via raycast against real-world planes and meshes using ARRaycastManager. Shows how to place virtual objects on detected surfaces.
Image Tracking Sample
- Scene:
Samples/.../Core Samples/Scenes/ImageTracking
Demonstrates tracking of printed reference images and virtual content overlay. Supports static and mutable image libraries.
Plane Detection Sample
- Scene:
Samples/.../Core Samples/Scenes/PlaneDetection
Demonstrates detection and visualisation of horizontal and vertical planes via ARPlaneManager. Supports detection modes and optional convex hull planes.
Camera Frame Access Sample
- Scene:
Samples/.../Core Samples/Scenes/CameraFrameAccess
Demonstrates retrieval of raw camera frames (YUV / YUYV) using ARCameraManager. Includes sensor extrinsics, camera count query and GPU-accelerated frame access. Requires Allow ‘unsafe’ Code in Player Settings.
Spatial Meshing Sample
- Scene:
Samples/.../Core Samples/Scenes/SpatialMeshing
Demonstrates real-time environment meshing using ARMeshManager. Includes an opacity slider and the optional SpacesARMeshManagerConfig component.
QR Code Tracking Sample
- Scene:
Samples/.../Core Samples/Scenes/QRCodeTracking
Demonstrates QR code scanning and tracking via SpacesQrCodeManager. Multiple tracking modes available.
XR Interaction Toolkit Sample
- Scene:
Samples/.../Core Samples/Scenes/XRInteractionToolkit
Demonstrates standard XRIT interactions (ray interactors, direct interactors, teleportation) in a Snapdragon Spaces project. Compatible with the LeonardoXR configuration.
Composition Layer Components
The Spaces Composition Layer renders textures directly to the HMD, bypassing post-processing steps. Supported geometry types are Quad, Cylinder, Sphere and Cube. Useful for high-sharpness UI or elements that must maintain quality regardless of scene effects.
Additional Samples
| Sample | Description |
|---|---|
| Display Refresh Rate | Query and runtime setting of display refresh rate via the XR_EXT_display_refresh_rate extension. |
| Performance Settings | Setting CPU/GPU performance levels via the XR_EXT_performance_settings extension. |
Build and Run
This section describes how to build and deploy a sample application to the LeonardoXR.
1. Enable Developer Mode
Developer Mode must be enabled on the LeonardoXR to sideload apps. See the Utilities and Tips chapter for step-by-step instructions.
2. Connect the Device
Connect the LeonardoXR to your computer with a USB cable. The first time you connect, a dialog will appear on the headset asking you to confirm the connection — accept it.
3. Add Scenes to Build Settings
- From the Unity main menu select File > Build Settings…
- Make sure the scenes you want to build are listed in the Scenes in Build list. Add them by dragging from the Project panel or clicking Add Open Scenes.
- Alternatively, use Window > XR > Snapdragon Spaces > Add Scenes to Build Settings to add all Snapdragon Spaces sample scenes automatically.
4. Select the Run Device
In the Build Settings window, select your LeonardoXR in the Run Device field. If the device is not listed, click Refresh.
5. Build and Run
- Click Build and Run.
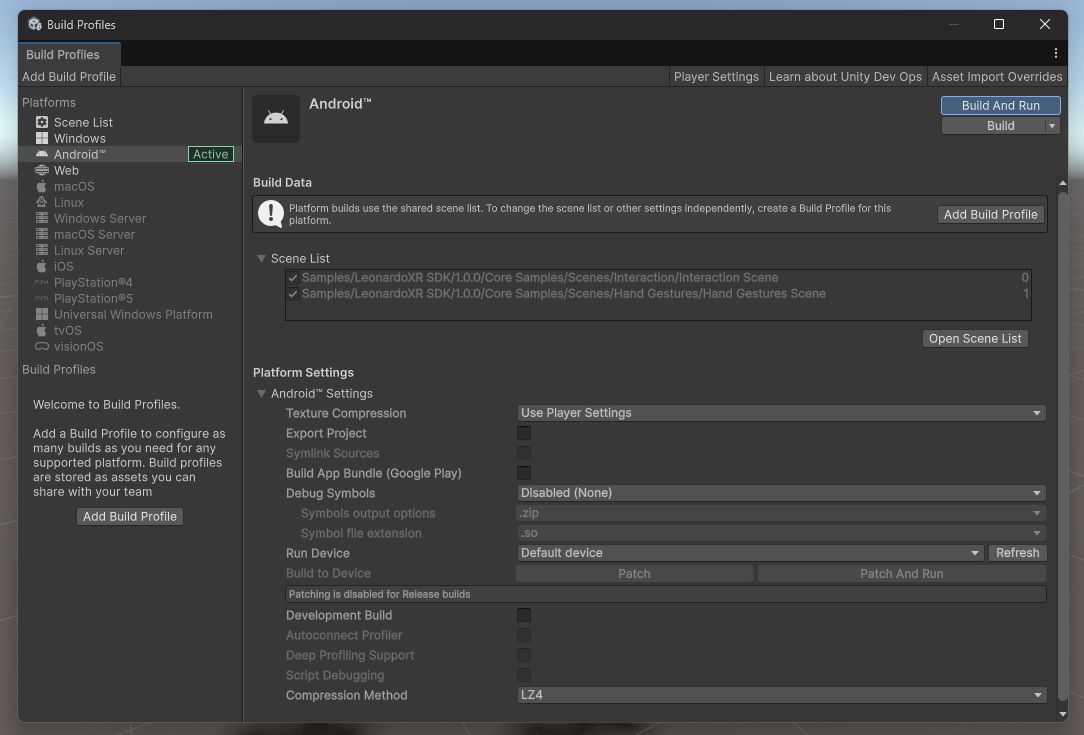

- In the Build Android window, enter a name for the APK file (e.g.
LeonardoXR_Demo.apk). - Unity will build and deploy the application. The app launches automatically on the headset.
If the app does not launch automatically, find it in the Apps tray on the device and open it manually.